비절개코성형
NOSE LIFTING by THREAD


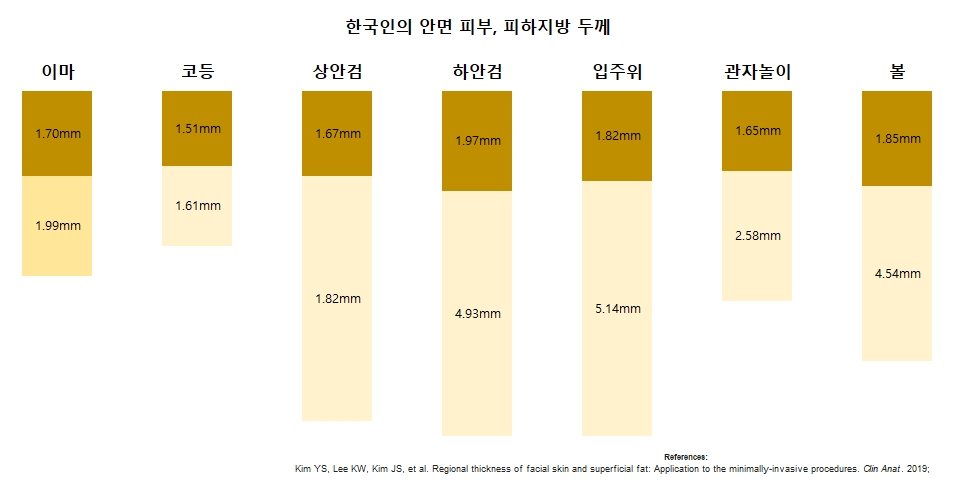
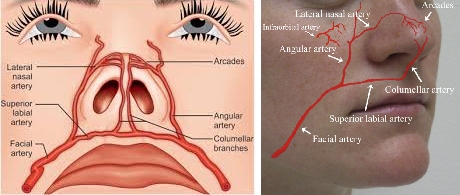
SHAPES OF NOSE The shape of the nose is very diverse, but at the center of the face it has a significant effect on the facial shape. Changes in the shape of the nose can make the face look smaller, cover, look intellectual, or look stronger. Traditionally, there are numerous shapes, such as straight nose, field nose, hook nose, eagle nose, wave nose, flat nose, big nose, small nose and fist nose. ANATOMY of NOSE Bone The lateral cartilage forms the lateral nasal wall, the septal cartilage between the two lateral cartilage and the two lateral cartilage is connected to the fibula and the maxilla, and underneath both the nasal cartilage. Nasal septal cartilage is formed by square cartilage and cosmetically has a significant effect on the height of the nose and the degree of shape curvature. Both nasal cartilage is connected under both lateral cartilage and the septal cartilage, and is connected to the fibrous lamellar tissue and the two muscles, the nasal nasal muscles (outer) and the nasal septum (inner), to determine the shape of the nose wing. Soft tissue Blood vessels Lateral nasal arteries: Blockages in the branches of the lower and lower arteries can cause necrosis of the tip of the nose and the nose. Skin The skin of the nose consists of the epidermis, the dermis, the upper fat layer, the fibrous muscle layer (SMAS), deep fatty layer, the periosteum, and the bones, which are common skin structures from the base to the nose. The materials of the Nose Lifting Thread are composed of an absorbable and non-absorbable suture. The material components currently used are as follows. In promotional terms, it is not the right expression to say protein thread or collagen thread. SHAPES OF NOSE LIFTING THREAD SPECIFICATIONS OF NOSE LIFTING THREAD Volume function : The function to increase the volume of the nose with the volume effect of the thread itself. Correction function : The ability to straighten the nose or wing with a straight line due to the elasticity of the thread Collagen synthesis function : The function that collagen is synthesized around the yarn during the biodegradation (mainly hydrolysis) of the thread. Even after the thread is completely absorbed, about 30% (40% in the paper) collagen remains, retaining so me form and giving two additional procedures for a long time. GENERAL INFO Preliminaries 1. Identify basic diseases, such as blood-related diseases or immunocompromised allergies, and especially blood pressure diabetes. COMPLICATIONs and SIDE EFFECTs 1. Infection, Inflammation: I experienced it once every eight years since I started nasal lifting-most of which is resolved with antibiotics and drainage, but removal is best if no rapport is formed. 2. Thread exposure. Exhaust: ⊙ The thread is pushed out to the side of Superior Labial Frenulum when the bottom of the column is fixed to the bone next to the ANS by over-correcting the nostril shape. 3. Asymmetry of the nostril. THREAD REMOVAL 1. To remove the inserted thread, you may be able to pull it out immediately during the procedure, but it will not come out well and the bleeding will be severe. Principle Technique 1. Raising the nose post may make the asymmetry of the nostrils inherent appear more pronounced. Principle Technique 1. Infiltration anesthesia and perforation: according to general technique. TIPS It is a procedure that elevates nasal root, glabella and nasion which are depressed by reduced collagen, it replaces the fillers which occur various complications. Anatomy of the root area of nose. Technique 1. Infiltration anesthesia and perforation: according to general technique. TIPS Remark 1. The purpose of this procedure is to avoid the risk of filler accidents and lengthening the maintenance period. Principle Technique Principle 1. Sterilize the treatment area and Anesthetize the infiltration well enough with regular lidocaine. Insert the thread in a square to apply the unfolding tension to the nose blades. Problems and Solutions When Nose Thread Lifting SIGN TROUBLE SHOT Anesthesia Injections Sore Make sure the patient understands that pain is more painful than normal anesthetics because they use anesthetics that contain vasoconstrictors to help hemostasis. Poor hemostasis at the perforation site Lidocaine-impregnated anesthetics containing adrenaline have the best hemostatic effect after a period of time (about 25 minutes after infiltration), so the procedure is the least bleeding 25 minutes after local anesthesia. If bleeding persists, compression is enough to stop the bleeding. Anesthetic drug swelling lessens lifting effect Make sure the tip of your nose is slightly higher than expected and your anesthesia will be normal. The nose ridge is skewed Draw the center point of the middle of the procedure during the procedure or correct it by inserting additional thread,Manually push the seal to the center or mask it with a filler. The nostrils are paired up Explain that the nostrils are more pronounced before the procedure. In the course of the procedure, the edges can be planted using the edges, or after the procedure, the bottom of the nose column is pushed to correct it. Thread is touched at the tip of nose Keep the skin away from the perforations (usually 2mm or more). When the thread breaks through your skin, pull it out slightly to cut it. If the thread tries to break through the skin, cut it with a needle and cut 1 ~ 2mm. The entire maxilla hurts Since the column is put on ANS, most of the irritation symptoms are discomfort, so explain about 1 month and check for inflammation. Have a strong bruise To avoid bruising in the first place, insert thread with DEEP FAT LAYER. If bruise, use brunch or cover BB Cream. Perforation site dents or pigmentation Make sure you stick the Duodom for two weeks and apply sunscreen on top of it. Lifting effect has been reduced for several months PDO seals are biodegraded in eight months and collagen is replaced by 30% to 40% of the volume. The thread come out of nasal cavity or mouth and throat Even if the procedure is successful, the pillar thread may sometimes be pushed out, but the coging of the thread acts in the direction of progression and may continue to move forward and break through the skin. Infection and Inflammation When inflammation occurs, firing may be resolved with antibiotic drainage treatment, depending on the principle or extent. When used with filler, the frequency is increased.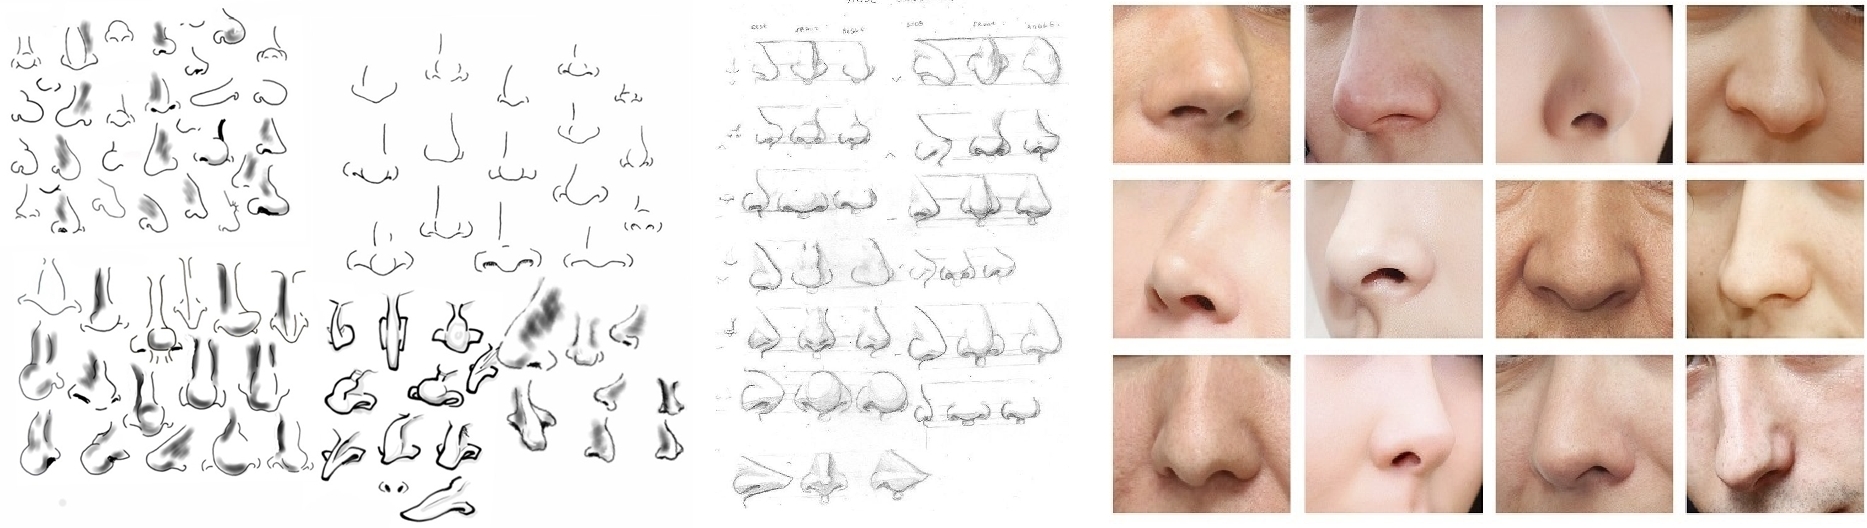
The formation of the nasal bone is created by the frontal bone and two nasal bones’ growth. The nasal bones on both sides are connected to the maxilla, and the lower part of the nasal bone is attached to the belly shape cartilage.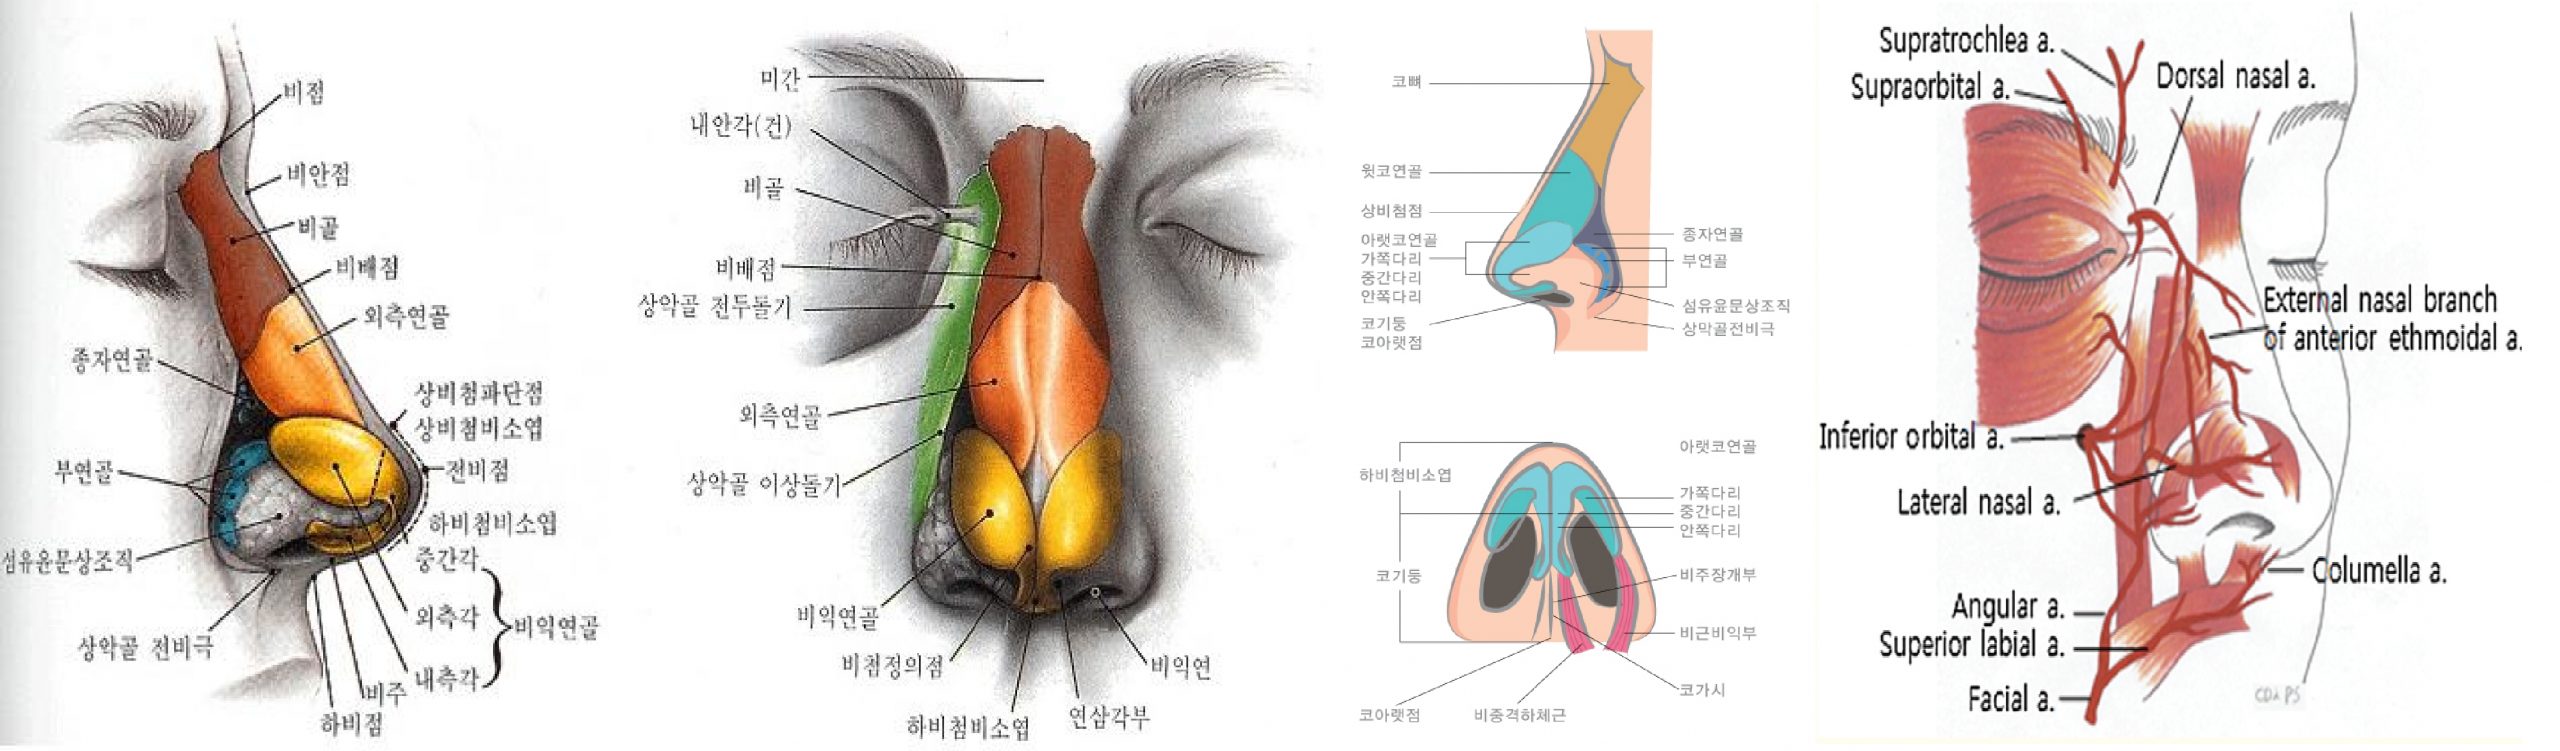
Other species and accessory bones may be present depending on the person.
Fibrous pyramidal tissue, located outside and below the posterior cartilage, is composed of collagen, elastic fibers and reticulum. Insulation. It has functions such as energy storage and transportation of nutrients. Beauty is one of the structures that determines the shape of the nose for Asians.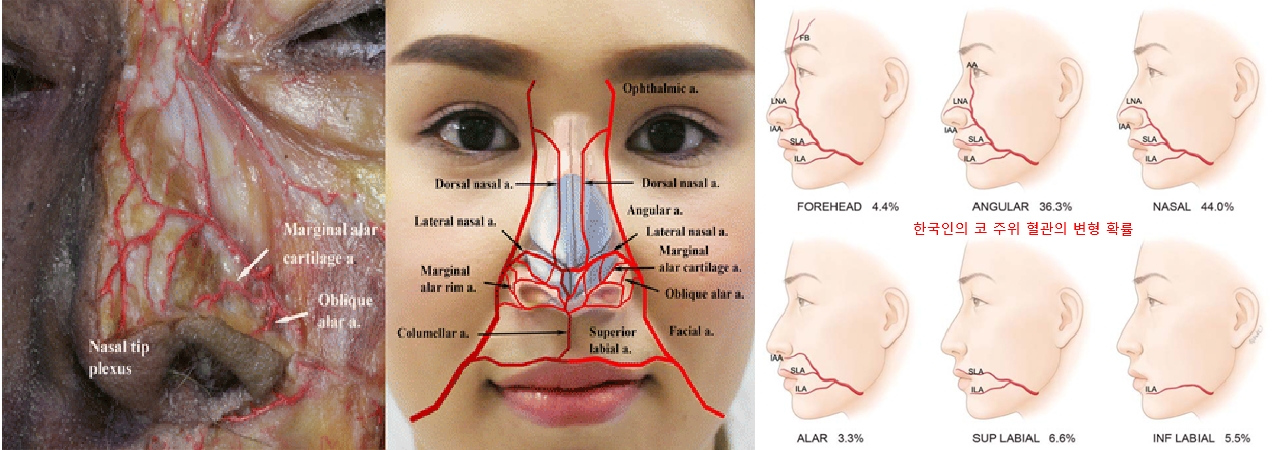
Columella artery: Branches of the superficial facial artery.
Angular artery: Climb up the nasolabial fold into the branch of the facial artery. It is the main cause of the nasolabial filler accident.
Supratrochlear artery, infra-ophthalmic artery, and facial artery are distributed around.
The layer through which the blood vessels in the nose pass is the upper fat layer.
MATERIAL CHARACTERS FOR NOSE LIFTING THREAD
(E-Moduls is the Young’s Modulus of Elasticity Index and the average is my own investigation.)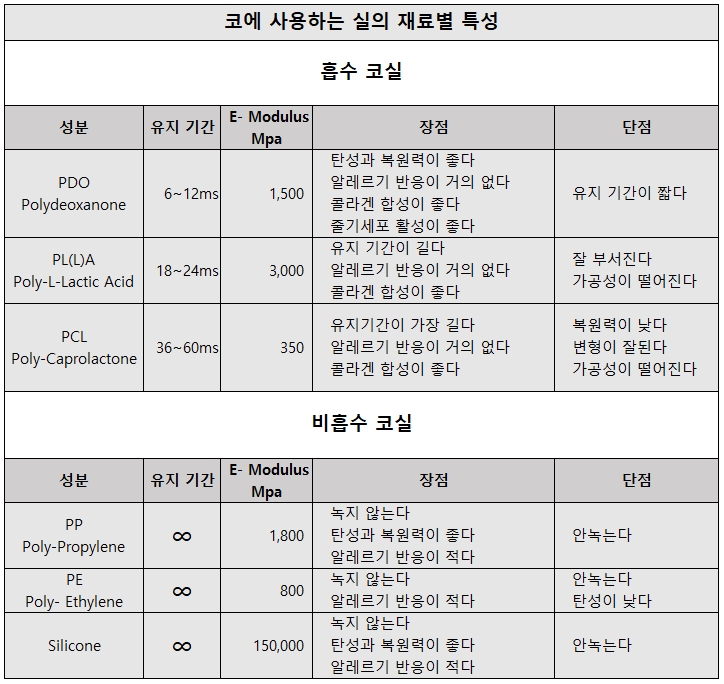
Several types of thread have been developed and are being developed that secure basic types and their shortcomings. Hico, Misco, Babico, Hyper Misco, Mizuko, Mijuco, Everco, Skyco, Stanco, Polyco, Texco, Etexco, etc. It is enough. It would be appropriate to just call it “nose lifting thread” ( Absorbable thread, Non-absorbable thread + barbed thread, single thread ).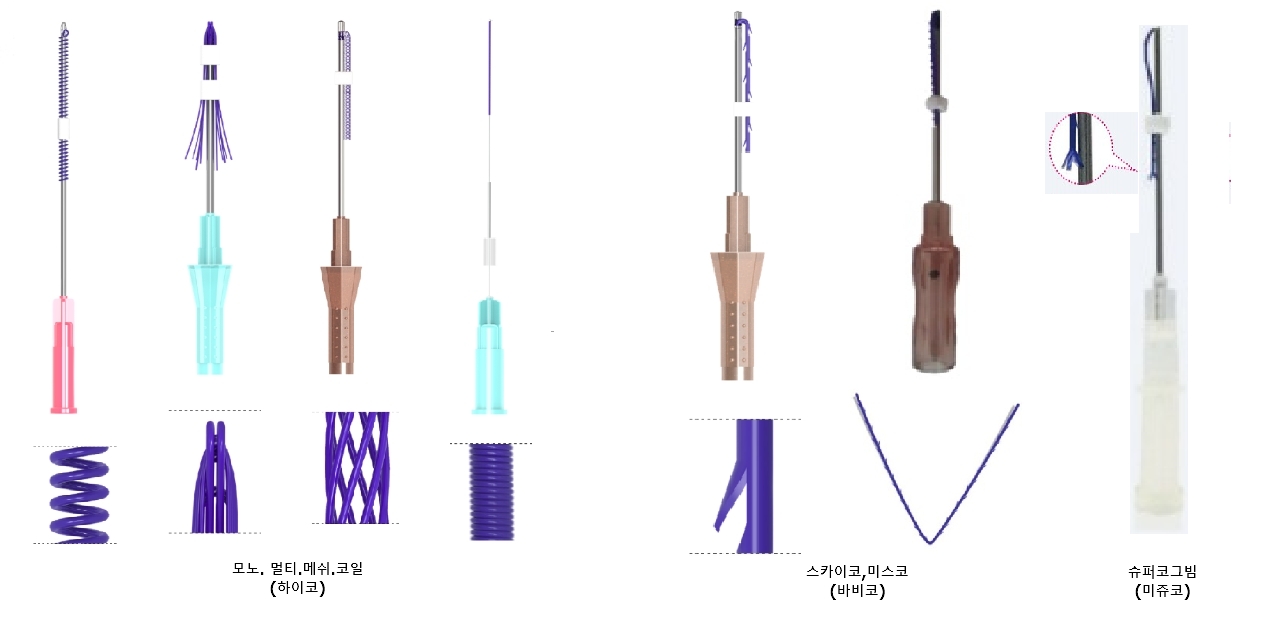 Simply edit and upload the nose lifting thread on the Internet.
Thread thickness :
USP 5-0 (0.1 mm)
USP 2 (0.5mm)
Length of thread : (Folded in half)
80 mm.
50 mm.
INSERT INSTRUMENT :
27G Needle
L-cannula 19G 38mm, 60mm
FUNCTION OF NOSE LIFTING THREAD
Support function: lengthen the nose posts to raise the tip of the nose.
The function of erecting the nasal column with a hard, fixed thick thread establishes exactly the base of the column on the sound wall of the anterior nasal sinus (ANS) of the maxilla.
2. Check and explain to patients that medications or dietary supplements may slow down hemostasis (aspirin, warfarin, blood circulation, red ginseng, evening seed oil, omega 3, etc.).
3. Explain the level of expectation (not as effective as the procedure) and the limits (duration).
4. Explain pain in nasal anesthesia.
5. Before finishing the procedure, raise your nose and look at the condition to explain that you can add more threads if you want.
6. Explain that differences in the shape of both nostrils may be noticeable and explain the limitations of correction.
7. The postoperative pain pattern explains that the pain in the nose and the entire maxillary sinus can be felt or touched for about a month because the lower pillar is supporting the maxilla.
8. Recognize that the tip of the nose is lowered to some extent after edema caused by anesthetics is reduced.
9. Recall that tissue resistance can be lowered by about 1 mm early by the vector to lower the raised nose tip.
10. Explain that 30% to 40% of the effect is improved even if the thread melts due to collagen synthesis. Explain that you can keep.
⊙ If the thread is not pushed all the way into the ANS, it will be exposed to the wall of the nasal column and stick out of the nasal cavity.
⊙ The thread is inserted into the epidermis or dermis without the inside of both nose wings.
⊙ If the thread enters the base of the nasal bone and the suture of the nasal cartilage, after a certain period of time, the thread continues to the nasal cavity.
2. If you want to remove it after the procedure, make an 1~2 mm incision next to the Superior Labial Frenulum in the oral cavity and use a micro forcep to pull out the anterior part of the seal above the ANS.
3. Cut the thread that comes out of the tip of the nose before cutting through the skin, cut it up and put it back in place.
4. Grasp the thread from the wall of the nasal column with forceps.
The supporting thread is used as the base of the column in the ANS( Anterior Nasal Sinus) and the spine toward the tip of the nose lifts the nose and raises the tip.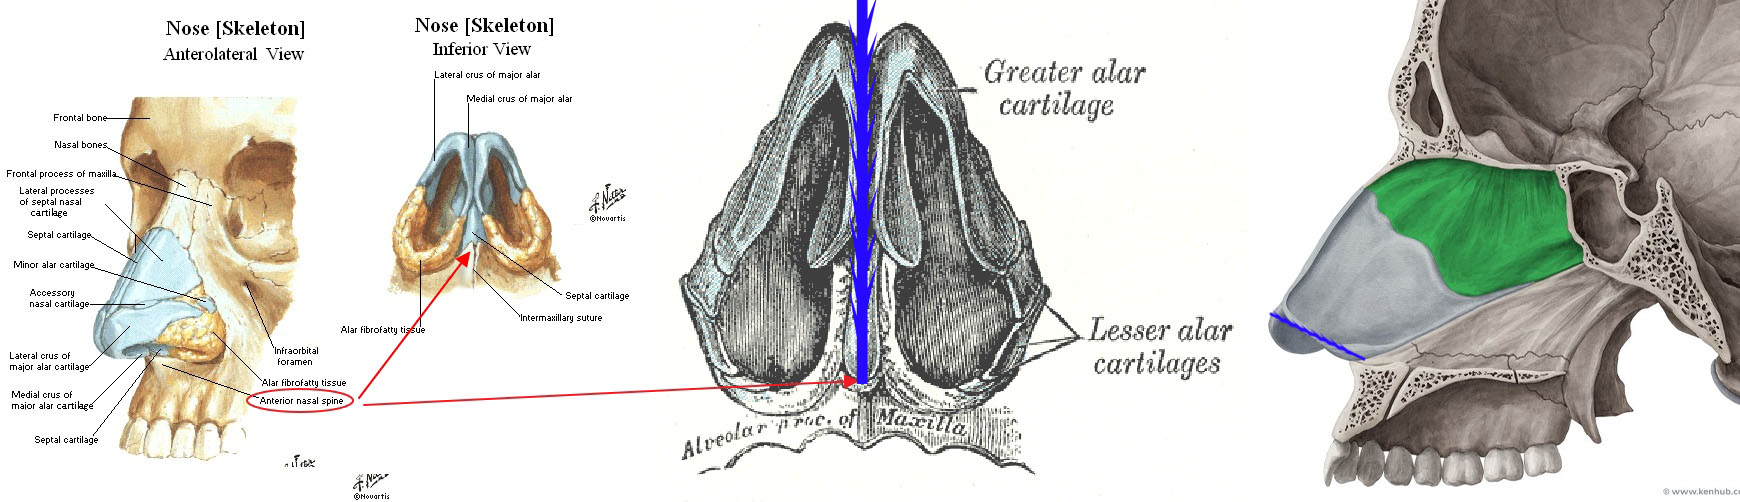
1. Sterilize the tip of the nose and under the nose column.
2. Invade anesthesia at the tip of the nose and the base of the nose column about 2ml of the dental anesthetic and wait 20 minutes until the hemostatic effect of the anesthetic is effective.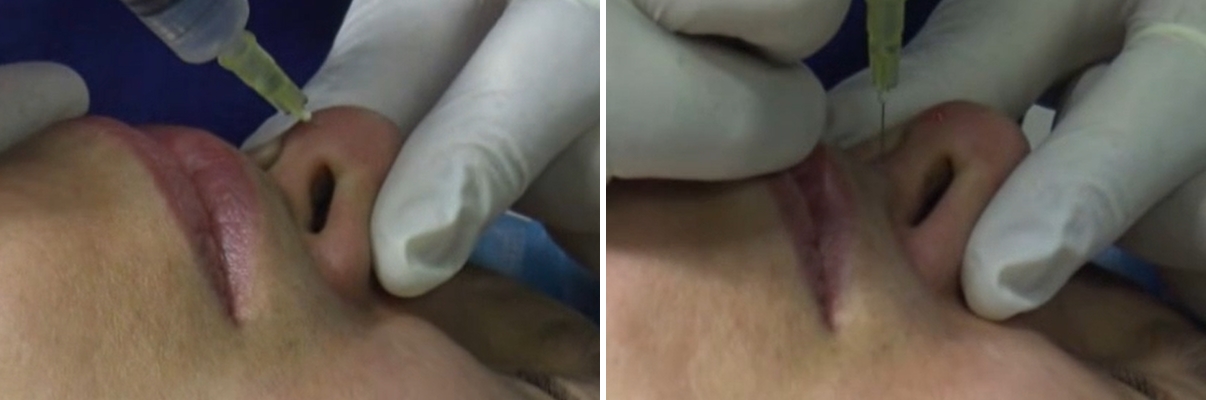
3. Make a hole with a 19G needle or a medical auger at the appropriate end of the nose (2 mm below the tip of the nose, depending on the practitioner, but varies from practitioner).
4 If there is bleeding from the capillaries of the columellar artery of the Superior Labial artery (SLA), which supplies blood to the nasal column, press the tip of the nose and wait for 5 minutes until hemostasis.
5. Using the drilled hole, gently push the Kosil mounted on the 38mm Cannula into the bottom of the ANS.
6. Position the thread so that it lies in front of the middle cartilage between the nose wing cartilage.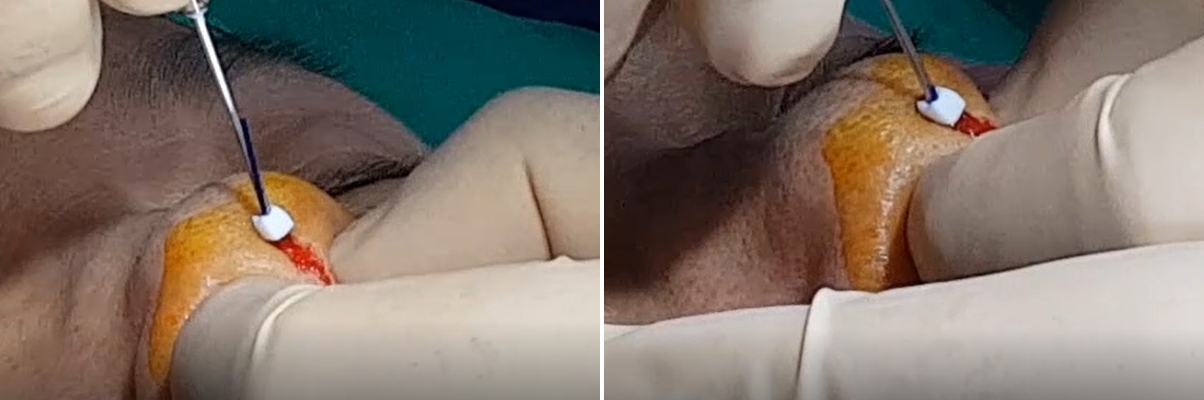
7. Push the cannula down with the force of lifting the nose during the pushing process.
8. If the resistance is too strong during the push, the direction is wrong and correct.
9. Insert the two threads and place the upper end of the thread with the micro forceps (about 2mm below the point to be raised). If there is no other procedure, such as the nose, show it to the mirror and show satisfaction. Check it.
10. Unless specifically refused by the patient, in case of raising only the nose, a total of four additional inserts will be inserted.
11. Seal one point with nylon 6 thread and attach the duodeum.
12. Harder fillers may be added, demonstrating much longer retention and appearance.
Nose raising procedure point: To make sure that the support point of the thread is located exactly in ANS.
2. The asymmetry of the nostrils is quite difficult to correct, so do not try as much as possible.
3. If you want to correct the asymmetry of the nostrils, make a proper design from the perforation area, and make sure that the apex of the tip of the nose does not deviate from the center of the face.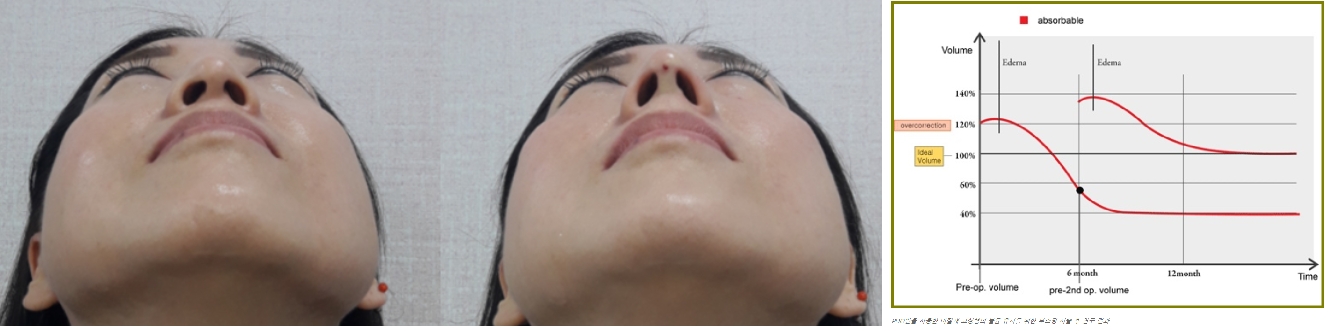 4. It should be about 1 ~ 2mm higher than I am satisfied and will be satisfied after 2 weeks.
5. When pushing the thread, it is more important to feel the force of lifting your nose than the pushing force.
6. If the insertion process is too resistant, most of the insertion layer is wrong.
7. If you try to raise a lot of side effects to the end of the nose end up nose as much as possible after the end of the thread through the skin cut only a certain amount of the end of the nose botox treatment in parallel.
8. Recognize the importance of additional procedures.
9. If the height is not high enough, the length of the thread may be short, the thread may not stand on the ANS, the cogging may not be sufficient, the material may be bent back, the thread may be broken in the middle, etc.
10. Design well within the ANS, puncture position, and entry angle so that it does not bulge like a pig nose.
Inserting the thread of support function and volume function between nasal septum cartilage and bilateral nasal bones to raise nose and live a gentle line.
2. Gently push the thread attached to the 60 mm Cannula along the deep fat layer through the punctured hole.
3. Insert the thread straight through the deep fat layer so that the thread passes through the center of the nose. This feels like a slight scraping of the periosteum.
4. Be careful not to go under the nasal bone when the thread reaches the nasal and cartilage joints.
5. Insert two threads, show yourself in the mirror and check customer satisfaction.
6. If not specifically rejected by the patient, insert an additional two and insert a total of four.
7. Suture the perforated area with nylon 6 one point and attach the duodeum.
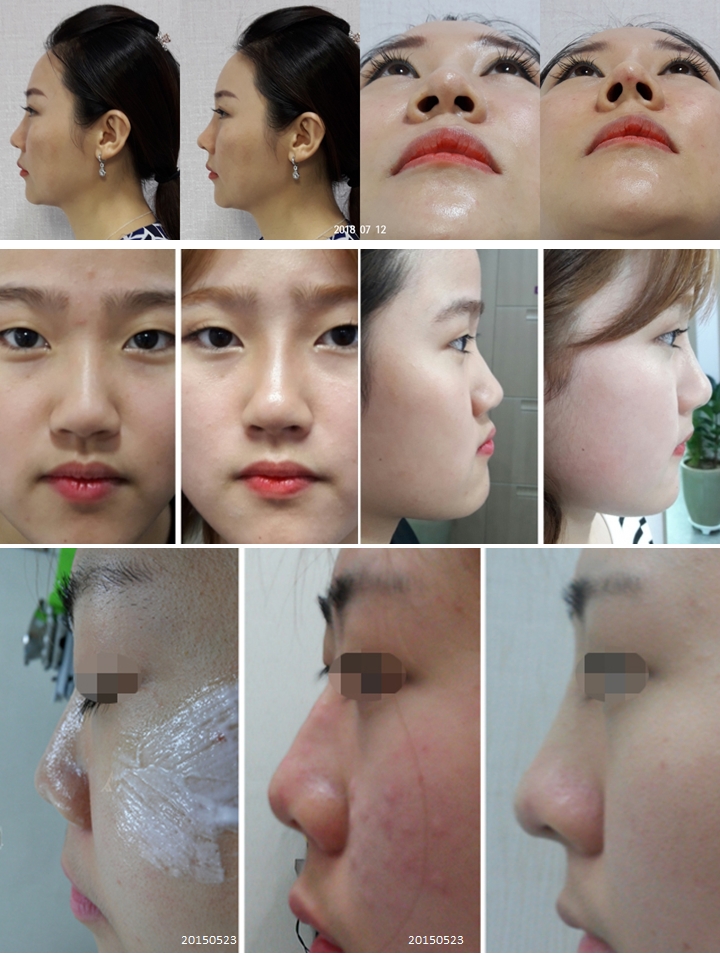
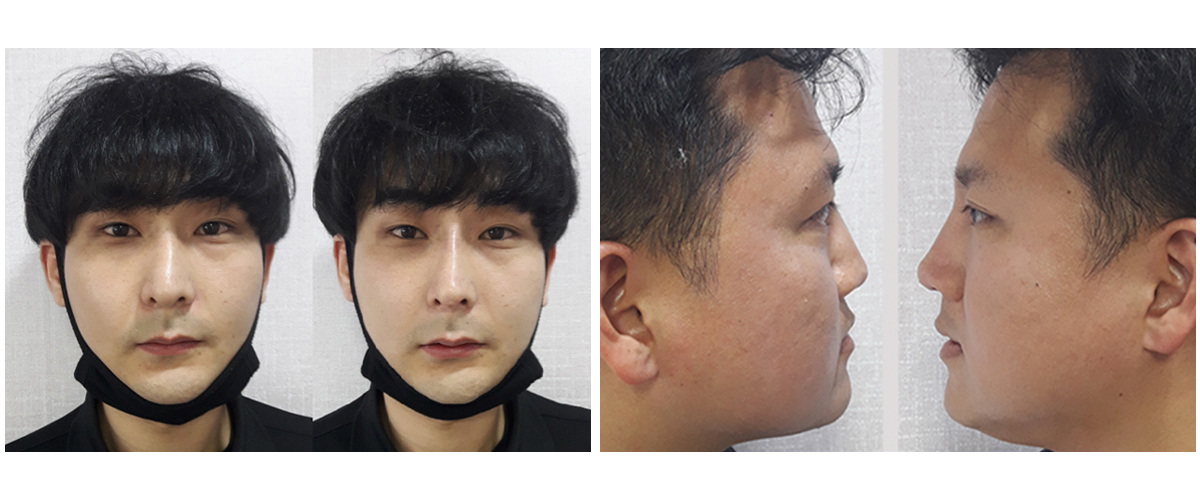
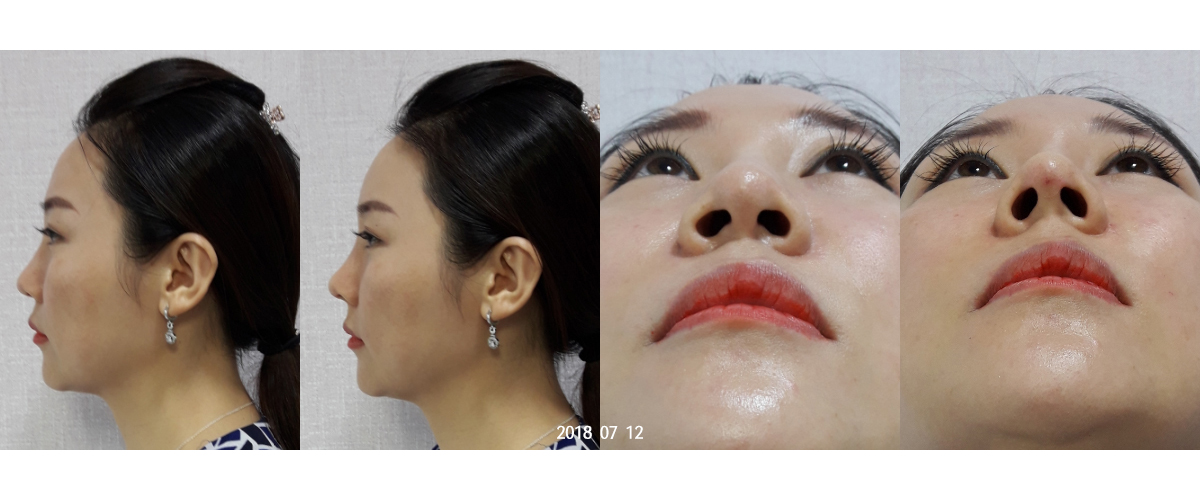
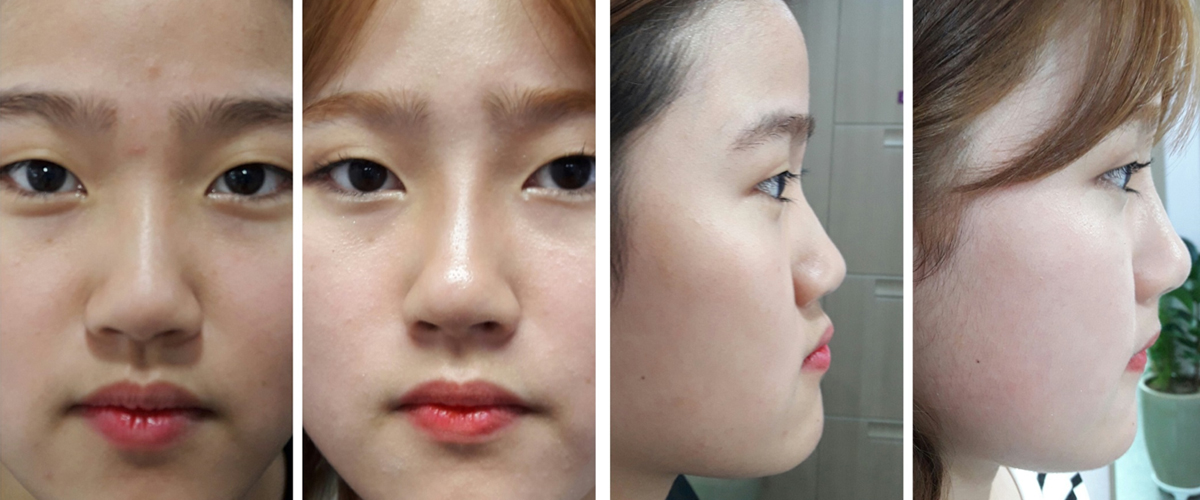
12. Explain that the addition of filler, along with the risk, makes the retention period and shape much more satisfying.Case treated to correct spatula. The lower jaw looks back by raising the nose and nose without cutting the chin.
1. The most important technique of the nose thread lifting is a technique (insertion by checking the center line several times) to ensure that the line raised by the thread of the nose is centered.
2. Insert a thread through the deep fat layer, scraping the periosteum away from the blood vessels.
3. Pull the nose and the tip of the nose down to catch the thorns to lengthen the nose.
4. Check with your doctor and insert a thread up to the nose roots between your eyes.
6. Although it is beyond the area of the nose, the off-eye or raising of the base sometimes insert the thread in the high-brow.
7. Recognize the importance of additional procedures after 6 months.
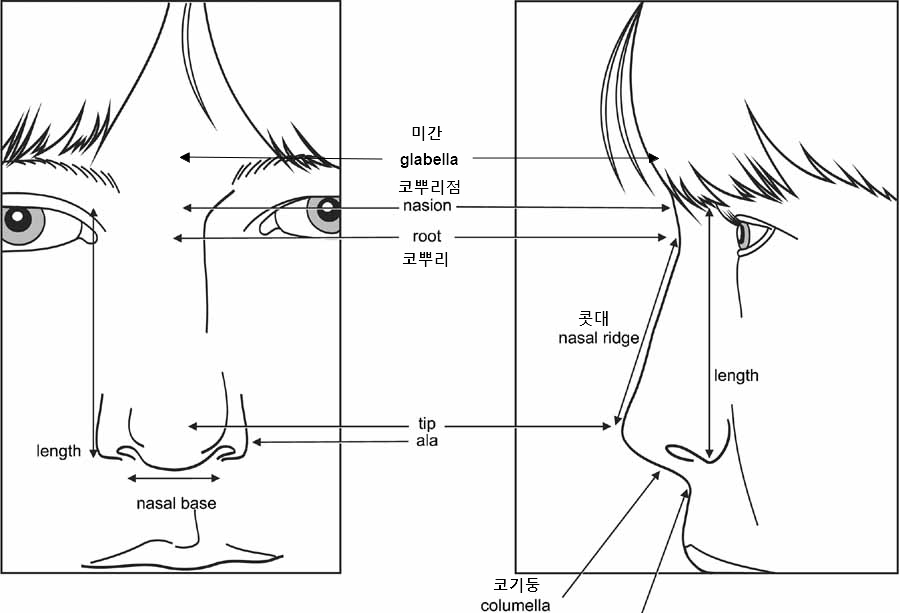
ELEVATE NASION
2. Gently push the thread attached to the 60 mm Cannula along the deep fat layer through the punctured hole.
3. Insert the thread straight through the deep fat layer so that the thread passes through the center of the nose. This feels like a slight scraping of the periosteum.
4. Be careful not to go under the nasal bone when the thread reaches the nasal and cartilage joints.
5. Insert two threads, show yourself in the mirror and check customer satisfaction.
6. If not specifically rejected by the patient, insert an additional two and insert a total of four.
7. Suture the perforated area with nylon 6 one point.
12. Explain that the addition of filler, along with the risk, makes the retention period and shape much more satisfying.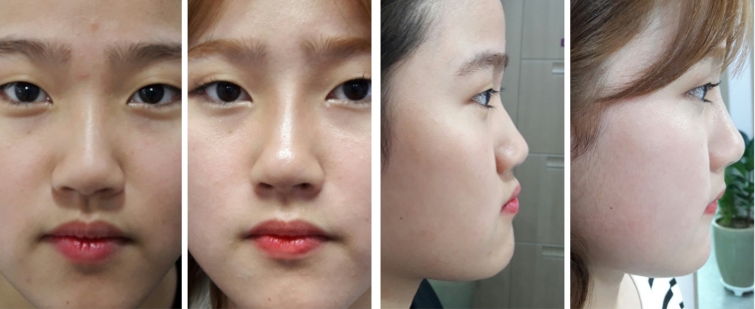 Case treated to correct spatula. The lower jaw looks back by raising the nose and nose without cutting the chin.
1. The most important technique of the nose nasion and ridge thread lifting is a technique (insertion by checking the center line several times) to ensure that the line raised by the thread of the nose is centered.
2. The cannula containing the thread is measured and modified at an easy angle to enter.
3. Gently push the thread attached to the 38 mm Cannula through the perforated hole along the deep fat layer above the periosteum.
4. Raise the volume of the glabella and nose roots to make the shape come out.
5. At this time, insert the dedicated lifting thread on the center side and mesh cylindrical mesh thread on the edge so that the surface comes out smoothly.
6. Mesh Cylindrical Mesh thread has a lot of elasticity because it traps structurally sufficient elasticity.
7. Recognize the importance of additional procedures after 6 months.
2. 38mm 2.0 thread for elastic PDO to nose in center area raises the area and 38mm 2.0 thread for smoother PCL Mesh thread around the edges makes smoother margin.
3. The characteristic of PCL MESH thread is that the retention period is about over than 2 years, it is soft and the collagen synthesis is good.
4. If you pay attention only to staining and scarring of the perforated area, the risk is not high and there are few side effects.
5. Bend the cannula at an appropriate angle to facilitate the procedure.
NARROWING NOSE BASE
Reduction of the base of the nose by using a narrowing vector of the base of the nose responding to the cogging vector of the bidirectional visual chamber is a procedure that has the additional advantage of raising the nose.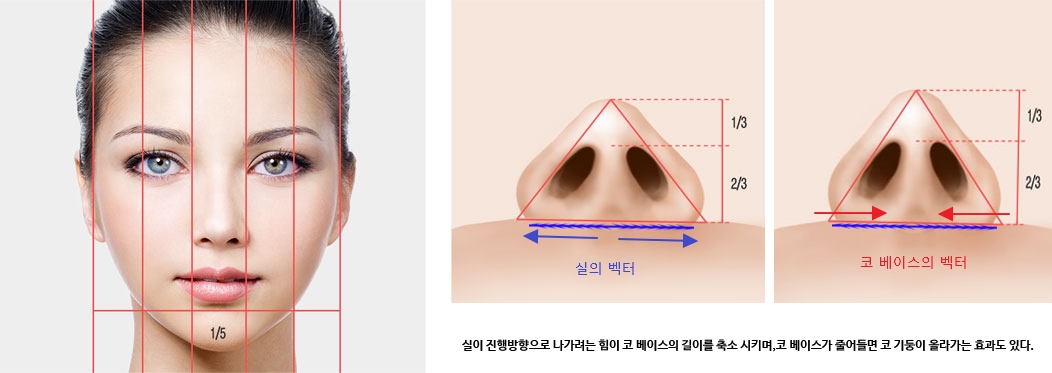
2. Insert the middle of the nose base seal mounted on the 38mm Cannula through the punched hole so that it is exactly centered.
3. Both ends of the thread should be at least 1.5 mm deep from the skin.
4. Insert one expression alternately on both sides, insert two at once and evaluate and add up to four.
WINGS
It is a technique of spreading the nasal wings using the restoring force of the thread by inserting the supporting function thread into the nose wing.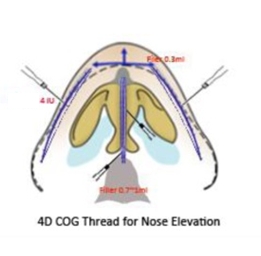
2. Design and anticipate the route enough to allow the progress of the thread to spread the nasal wings.
3. Inject 2IU of Botox 4IIU into the nose blade.
5. Insert the thread after punching where the thread will enter.
6. Recognize Fibroaleolar Connective Tissue, a histological feature of the nose wing, slowly pass over the cartilage in the upper part and slowly enter the central part of the Fibrous Connective Tissue tissue in the lower part through the PDO 38mm 2.0 Cog Thread.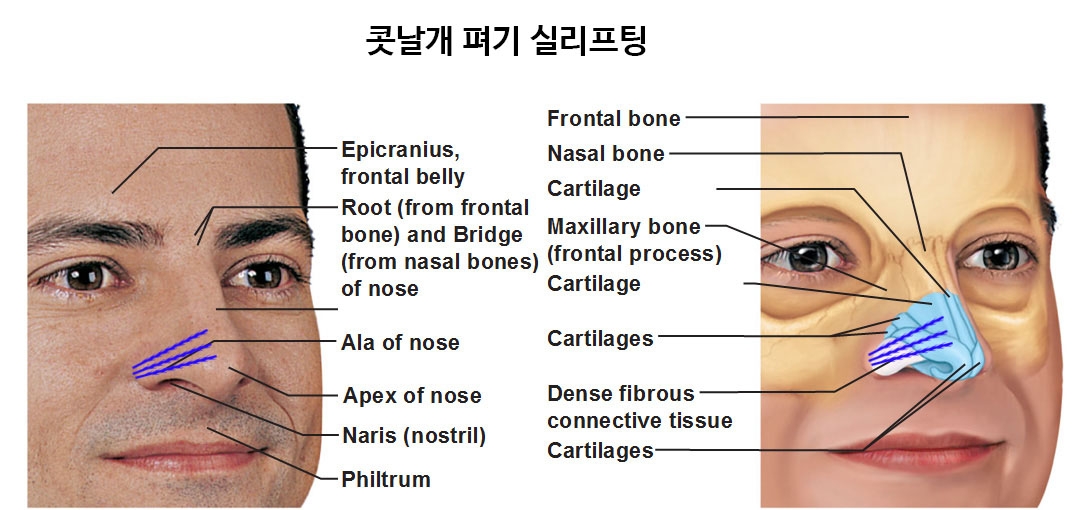


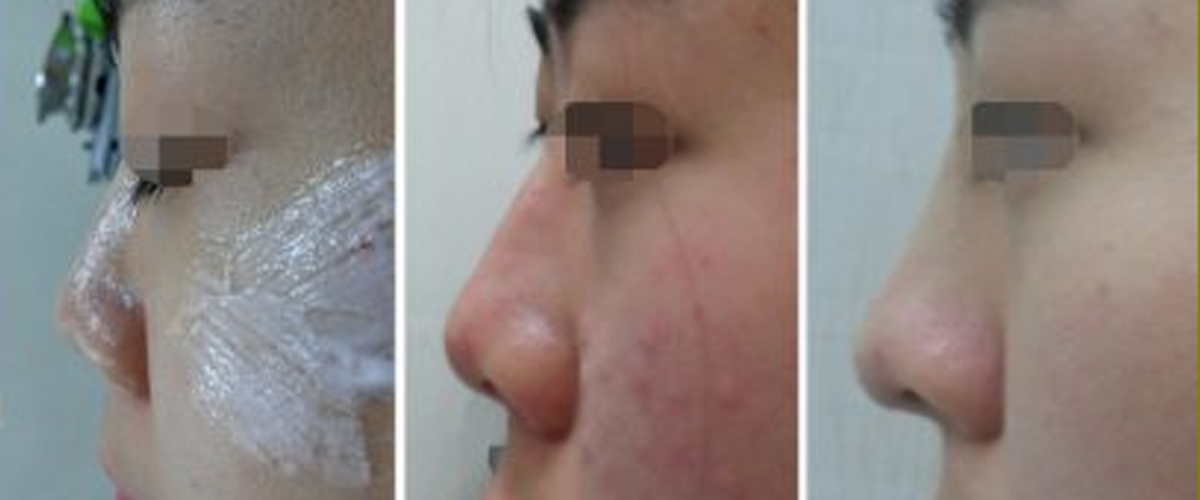
The shape of the drilling hole is less tension, drilled to the field to the side, less depression, and filled with a filler when the depression.
Pigmentation is observed or treated with Nd-Yag laser.
An additional procedure is recommended between 6 and 8 months after the first procedure. In this case, the lifting effect is about 5 years.
PDO Thread have a collagenesis effect, resulting in a 30% improvement in the biodegradation of the thread.
Typical cases include inserting under the nasal bone when inserting the nasal thread, and when the nasal column is out of the ANS and when the nasal thread is inserted too far past the epidermis.
https://sborl.es/wp-content/uploads/2018/01/Nasal_Anatomy.pdf